Simplifi User Manual
How to Publish a Job
Open the Job Publishing Page
You can open it in two ways:
- From the left-hand menu, click Publish Job, or
- On the top taskbar, click Jobs → Publish Job.
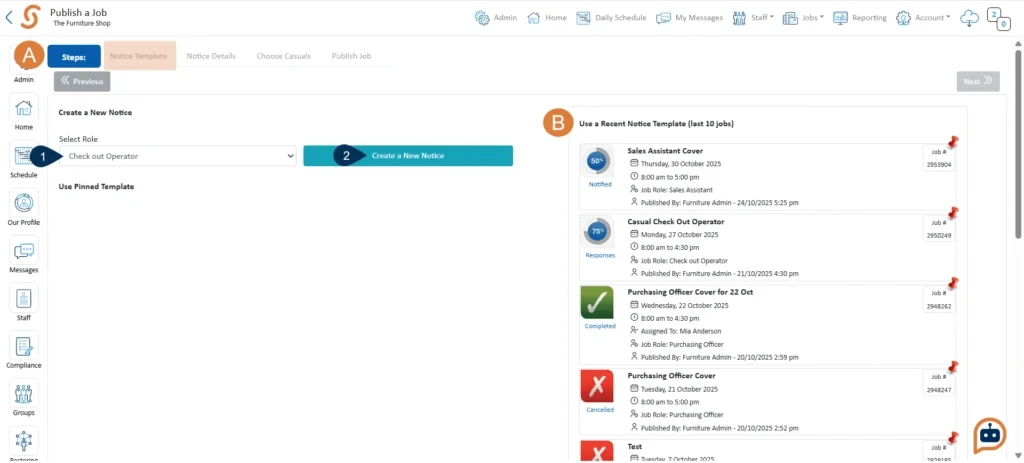
Notice Template
- From the dropdown, select the Role.
- Choose Create a New Notice (or select a template from your recent notices on the right).
A. You’ll see tabs at the top that represent each step of the process. The step you are currently working on is highlighted in orange.
B. Previously listed jobs are displayed on the right hand side. You can use these as templates by simply clicking on them.
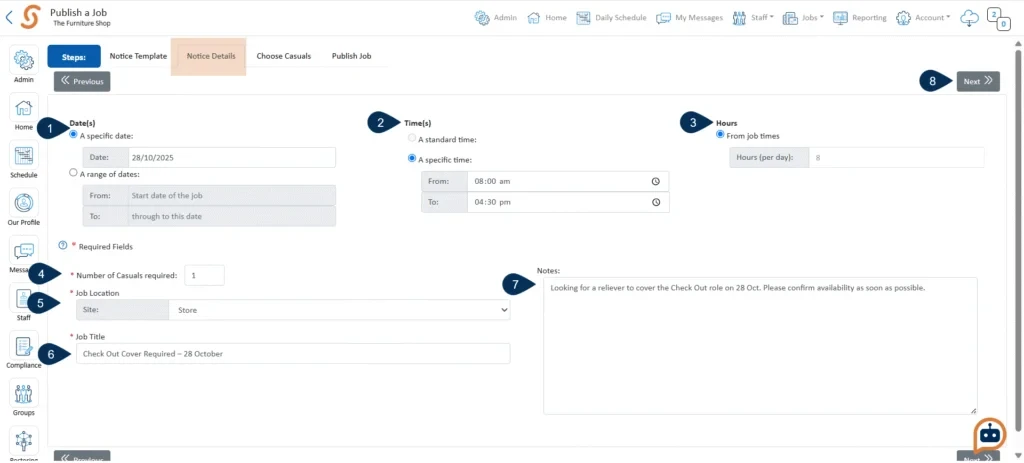
Notice Details
- Specify Date(s) – select either a specific date or a range of dates.
- Specify Time(s) – choose between a standard time or a specific time.
- Specify Hours – either use job times or enter a fixed number of hours.
- Enter the number of relievers needed for the job.
- Select the Job Location.
- Enter a Job Title.
- Add any Notes (optional).
- Click ‘Next’ to proceed
Replacement/Custom Details (Optional)
Enter details of any staff absences and reasons, or add extra job information if required.
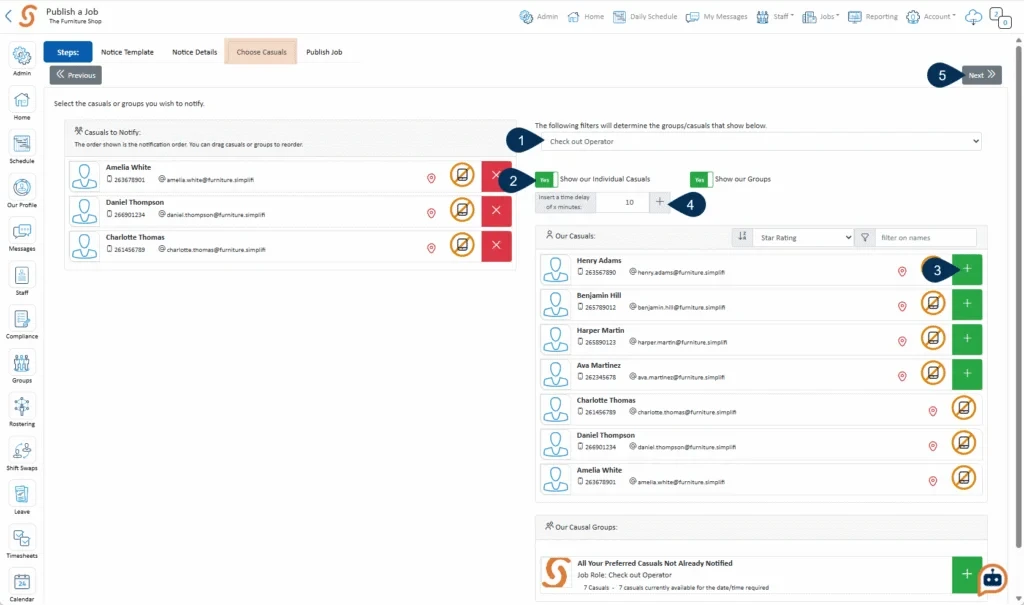
Choose Casuals
- Select which casuals or groups to notify. Use filters to narrow by role or location.
- Use the toggle to show individuals, groups, or both.
- Click the green “+” to add casuals or groups to your list.
- (Optional) Add time delays between notifications by clicking “+” beside the list.
- Click Next.
Successful Reliever (Optional)
This section is optional and allows you to provide the successful reliever with any additional information they may need for the job. These are fields that are created during the simplifi Setup.
Once assigned, the reliever will receive the details by email and will also be able to view the information and access any attached files online or through the app.
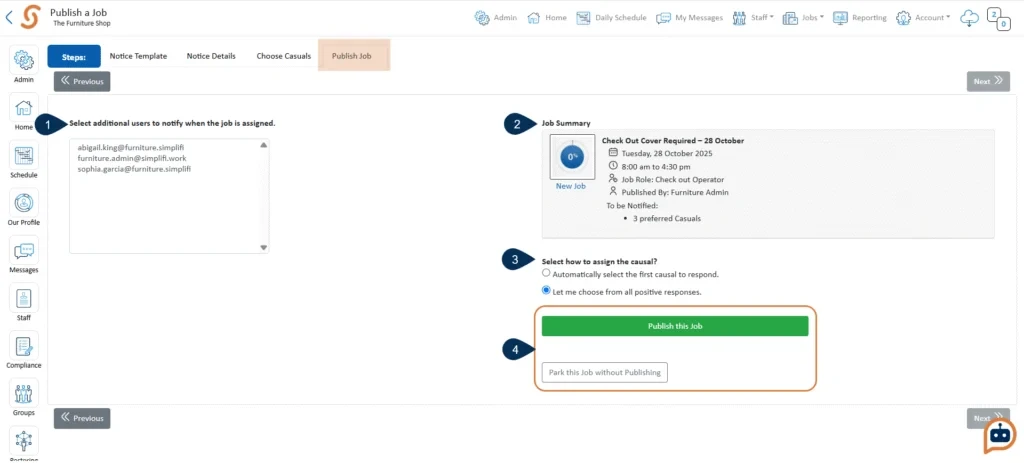
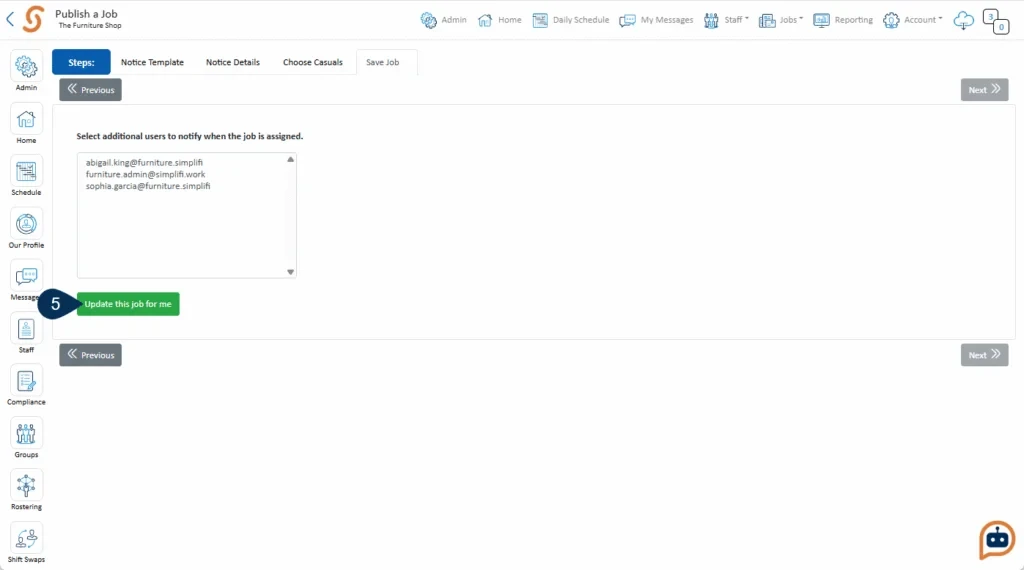
Publish Job
- Choose other users who should be notified when the job is assigned.
- Review the Job Summary.
- Choose how to assign the reliever:
- Auto-assign: First reliever to accept gets the job, or
- Manual: You choose from all positive responses.
4. Click Publish This Job to send it out now, or Park This Job to save it for later.
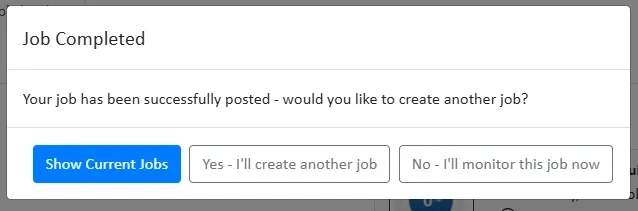
After Publishing
Once published, you can:
- View Current Jobs
- Create Another Job, or
- Monitor This Job
Relievers will receive a push notification (and email if enabled).
They can Accept or Decline the job directly from the link in the notification.
Their response will automatically appear in your system for review.
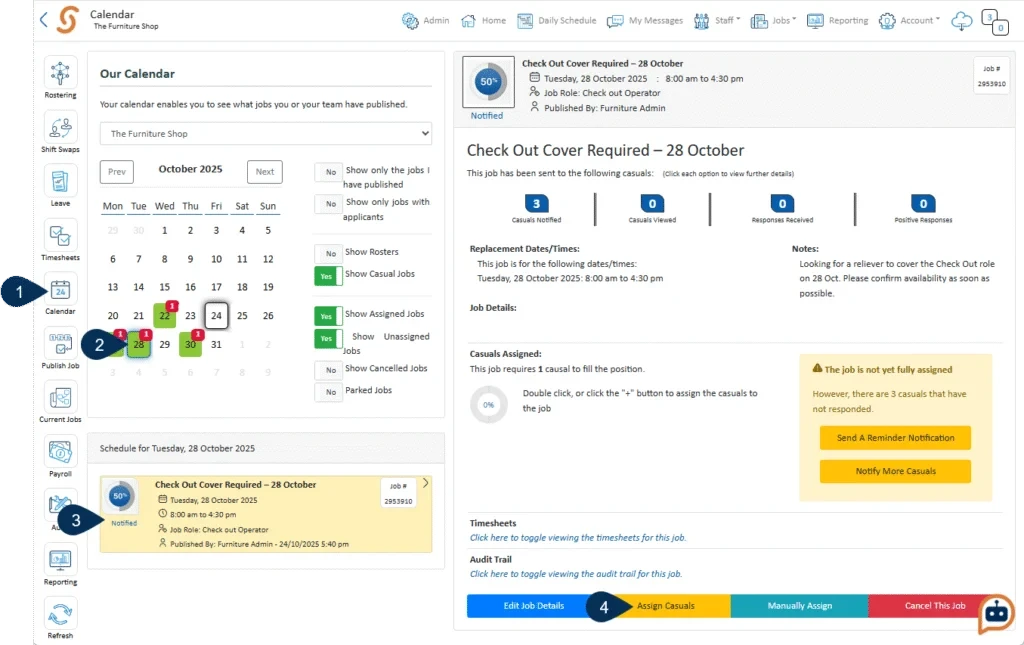
How to Assign a Casual to a Published Job
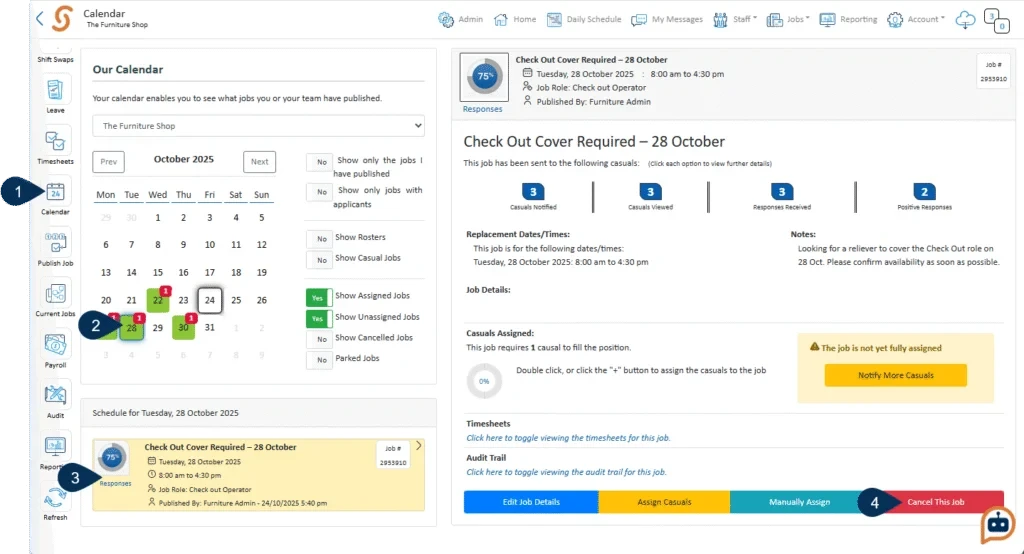
- Go to the Calendar.
- Select the date of the job.
Jobs scheduled for that date will appear beneath the calendar. - Select the job you want to assign casuals to.
- At the bottom of the job, click Assign Casuals.
If any casuals have already responded to the job, their names will appear in the list of casuals. - Click the + next to the name of the casual you wish to assign to the job.
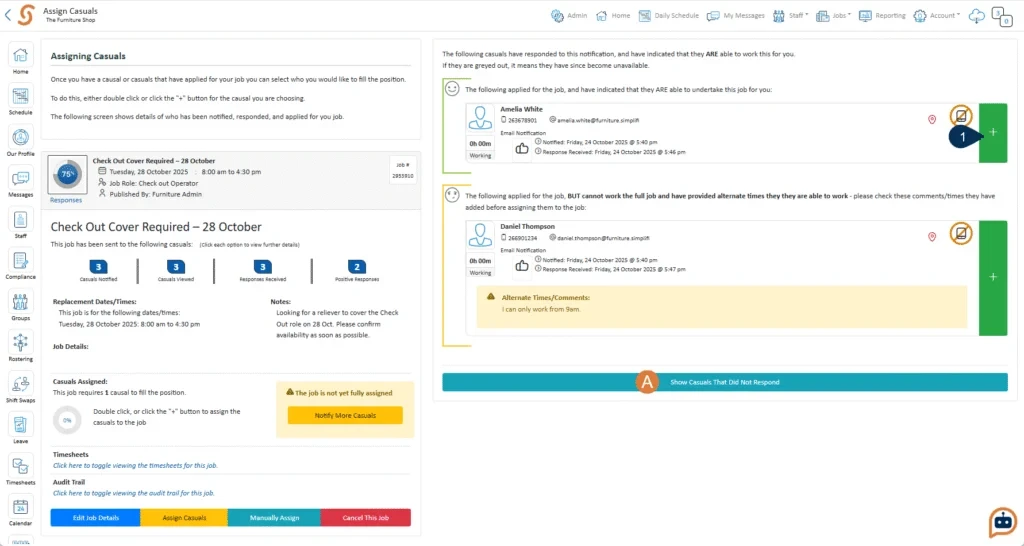
A. To view casuals who have not responded, click the “Casuals that did not respond to your job” tab.
Once a job is assigned to a casual, the system automatically sends out notifications. The selected casual will receive a confirmation, while all other applicants will be notified that they were unsuccessful. Notifications are delivered as push alerts to their device, and if they have email notifications enabled, they will also receive an email.
How to Edit or Cancel a Job
If the job hasn’t been assigned to a casual or marked as completed yet, you can still edit its details or cancel it.
A. Edit the Job Details
- Go to the Calendar.
- Select the date of the job.
Jobs scheduled for that date will appear beneath the calendar. - Select the job you want to edit.
- Click Edit Job Details - This step should take you to the job editor and make the necessary changes.
- Save the job as usual - Once you have edited the job make sure to go to the final step and click ‘Update this Job for me’.
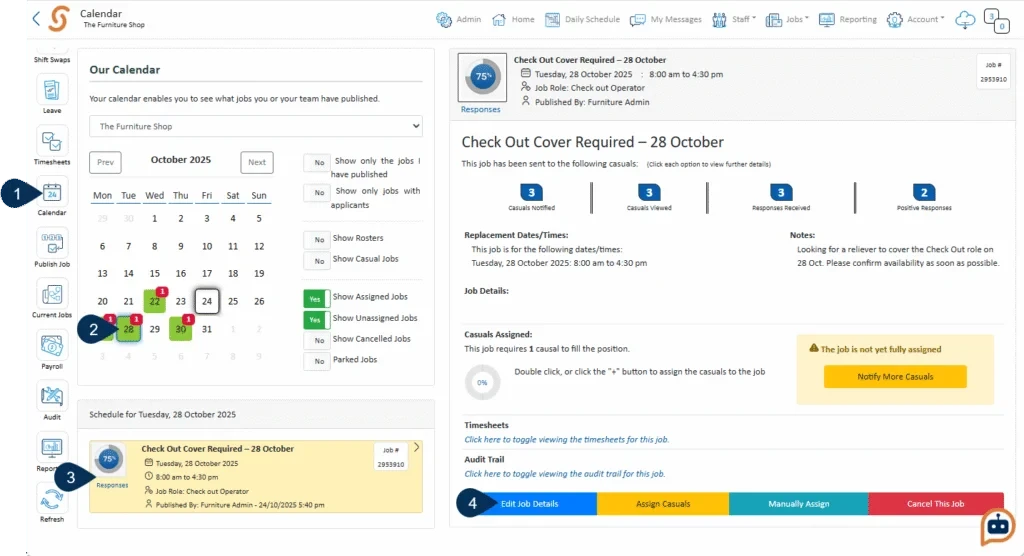
B. Cancel the Job
- Go to the Calendar.
- Select the date of the job.
Jobs scheduled for that date will appear beneath the calendar. - Select the job you want to cancel.
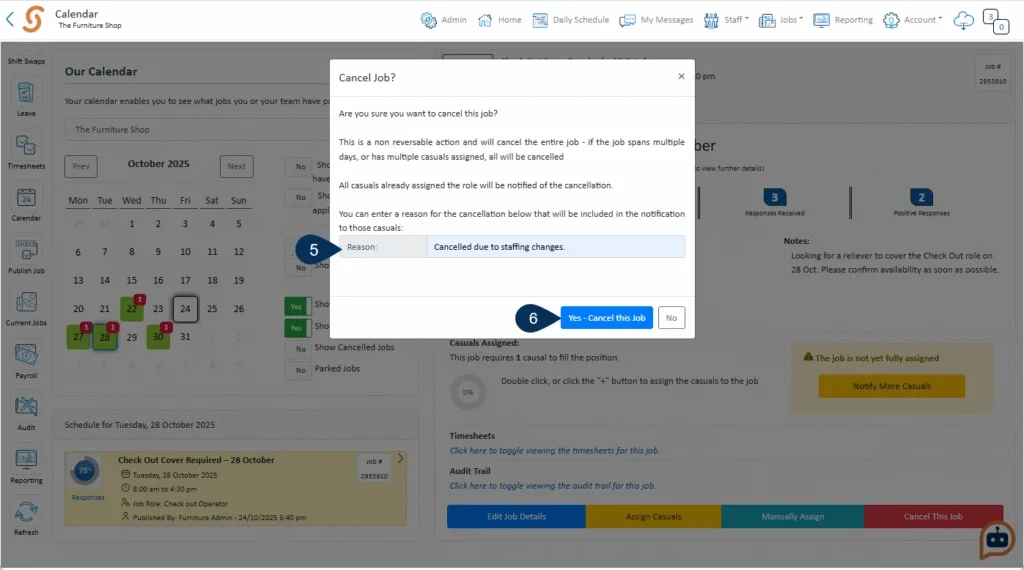
- If you want to cancel the job, click Cancel This Job.
- Optionally, add a reason for the cancellation.
- Click Yes – Cancel this Job to confirm.
Once the job detail has been edited or cancelled, the system will notify the selected recipients. Notifications are sent as push notifications to their devices. If the recipient has email notifications enabled on their phone, they will also receive an email.